7 Step to Productivity Work Life
My 7 Step Productivity Hack
There is a huge sense of freedom I get from working online. However the deeper we get into online business, SEO and internet marketing the bigger our task list becomes.
Managing your time effectively so that you can complete the tasks that need to be done can be challenging, especially when the heat is on.
Combine that with procrastination, and you have a big problem. I don't know a single person who doesn't suffer from this at some stage or in some form.
There is a lot to be said for just getting things done. We all know what needs doing, so why do we feel like we are getting nowhere. Why is your task list still so long and what was it that you wanted to complete today?
Weather you have one project or several, there is one tool in my arsenal that I cannot do without.
Trello Explained
Trello is a project and task management tool that follows the Lean Manufacturing Methodology.
The first thing to note is that it is completely free to use and if used right, can be extremely powerful.
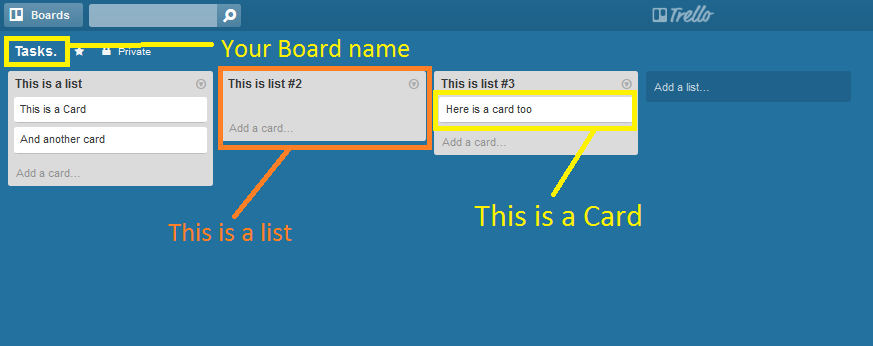
This is my Trello dashboard, where the magic of simplicity happens.
To prepare your own, just follow these 2 steps.
- Sign up for a free Trello account here.
- Create a New Board by clicking on the “+” sign next to your name in the top right corner , choose ‘New Board' and give it a name of ‘Tasks'
 The dashboard is composed of 3 key elements.
Boards
Boards are the highest level of data. You can use a different board per project, per team member or you can use just a single board for task management (like I do).
Lists
Lists are the vertical grey boxes that you see in the image above and are a way to organise your board into segments.
For example, organising your tasks into days. You would have 7 lists, 1 for each day of the week.
Cards
Cards represent a task or a ‘To Do' item and you add these to a list. You can also move these cards around between lists.
For example, if you have a ‘To Do' list and a ‘Complete' list, once you have completed the task you would drag the card into the ‘Complete' list and move onto the next task on the ‘To Do' list.
How I Use Trello
Trello is very intuitive so it really is easy to get started. There are so many ways you can work with Trello and manage your tasks however, it is important to define a structure and stick with it.
My thoughts on using any tool or system to manage and maintain a process are 3 fold;
- The tool/system must be easy to maintain and not a drain on my time
- The setup and day-to-day interaction must be simple
- The tool/system must by clean and easy to read/navigate
I have used a number of resources that have helped me get my task management and productivity to where it is today and what follows is the exact process I use each and everyday to Get Things Done.
My 7 Step Process
This process is so simple to set up, maintain and follow that within a week, I guarantee you will be wondering how the heck you managed without it.
Step 1 – Create your 7 lists
So we are going to create 7 lists on our ‘Tasks' board and name them as follows;
1) Big Priorities – Add cards that cover the topics that are the most important to you right now. These can be projects you're working on or life goals.
2) Today – place all tasks that you wish to complete today in this list.
3) Incoming – all tasks that you need to complete, that cannot be done today go here. We then populate the ‘Today' list each morning using this ‘Incoming list
4) This Week – a place for not so important tasks, that perhaps don't have a tight or set deadline, however you wish to complete them at some point this week.
5) Later – other ‘non-urgent' tasks that can be done at a later date.
6) Waiting On – Tasks you cannot do as you are awaiting action from a 3rd party.
7) Done – all completed tasks are moved to here once completed
Step 2 – Adding and Naming Labels
Labels are an unsung hero of Trello, or any task management system for that matter. In this case they give you an immediate visual connection between project and task.
To change the label names, simple add and click on a card. To the right you will see the ‘Labels' option. Click this and you will be presented with the labels box where you can click the “Change label titles…” link.
You will be presented with a box like the image above. For each color assign one of your “Big Priorities” and save.
Step 3 – Adding your “Big Priorities”
This section really depends on you and your current goals. However I use the first list for my “Big Priorities”. They include this blog, RankSource, LifeOfMen, my mastermind group and a couple of other projects I am working on.
You can add life events here too if you wish, such as getting fit, reading 15 new books, spending time with the kids and even picking up the milk on the way home!
Step 4 – Adding Tasks
There is no science to this process, which is what makes it so easy.
If you're starting with a clean slate, you may be importing (or copy/pasting) tasks from your old system or tool that failed you. In this case I suggest you add them all to the ‘Incoming' list.
Each new task I add goes to the ‘Incoming' list for prioritisation at a later time.
Step 5 – Prioritise
The first rule here is don't run before you can walk. If you have 20 tasks on the ‘Incoming' list, don't add them all to the ‘Today' list and feel overburdened.
Add 5 and work with that. Once you start dropping completed tasks into the ‘Done' list and you get that sense of achievement, you WILL start to be more productive and tick off more and more tasks each day.
Step 6 – Making it Sing
Again, simplicity and ease of use is where we want to be.
My morning routine consists of a 15 minute board session. Trello board that is.
I simply spend the first 15 minutes of my day organising my ‘Tasks' board into an order I can manage TODAY. Not tomorrow or in 2 weeks time. Today.
Use the ‘Incoming' tasks that have been added over the last few days and drag them into the relevant lists.
The only thing you have to worry about during your working day is moving completed tasks from the ‘Today' list into the ‘Done' clist – and archiving the ‘Done' list at the end of the working day.
To summarise.
There are just 4 primary functions that you need to carry out on a daily basis
- Open up Trello and leave it open all day (30 seconds)
- Have a morning review of your tasks for the day (15 minutes)
- Move completed tasks over to the ‘Done' list (2 seconds each)
- Archive the cards in the ‘Done' list at the end of the day (5 seconds)
Rinse and repeat.
Step 7 – Emailing Tasks
Trello has the ability to add tasks it receives via email to your board.
To set this up all you need to do is;
- Click the “Show Sidebar” link in the top right corner of your board
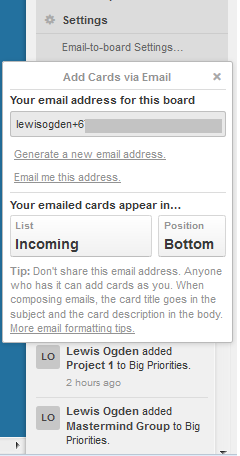
- Select the drop down menu and click “Email-to-board-settings…”
- Take a copy of the “Email address for this board” – this is the address you will email to add tasks too
- Change the list name in the “Your emailed cards appear in…” section to ‘Incoming' and choose ‘Bottom' for the position of new tasks on the list.
Now all you need to do is drop an email to the address we copied down in step 3 and the subject of that email will be your task name.
There are various other things you can include inside the body of your email in order to spruce up your tasks. Check out this link for more on that.


Comments
Post a Comment